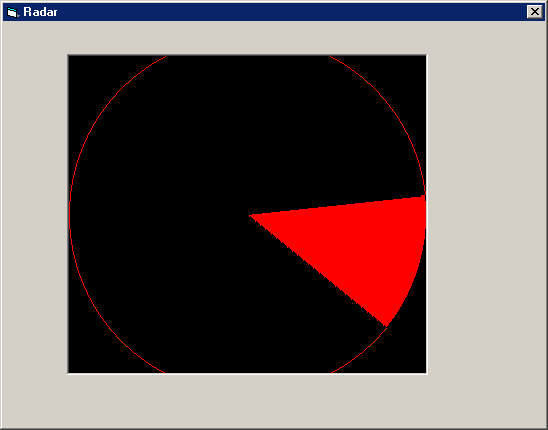
Shows you how to use Pi for drawing Arcs(part of a circle) to use as a radar.
Using Pi and Arcs for a Radar
Hi, I'm Philip and I'm going to show you to how to make a great radar for games or other stuff.
So...the first thing you need to know is what Pi is ! Pi is a number to calculate stuff with circles. Pi goes on for EVER !!! But of course we only need a few digits :
Pi = 3.14159265358979 (we need a double data type for that!)
You will need to put a Timer (called RadarSearcher) and a PictureBox (called
RadarBox) on the Form .So now we need to declare the globals (Pi and the Arcsize(in degrees)). So just type this
in :
'Globals for radar
Const PI As Double = 3.14159265358979
'We need Pi for calculating where the arc should be and at
what angle
Const ARCSIZE As Integer = 45
'Lets take an arc of 45 degrees size
Then we need to create the sub for the Timer. This is the main part (the
core) of the program which calculates and displays the radar. Once you've typed
the next block of code in set the Enabled property of the Timer to true (which
is actually the defaut, but just making sure) and the Interval property of the
Timer to 100. Having the Interval property at 100 makes the Radar look
smooth-running. If you want to you can set the Interval property to 1000 and see
what happens. So enough of the boring stuff... Let's get down to business :
'Timer Sub for calculating and displaying the radar
Private Sub RadarSearch_Timer() 'The main Timer (Interval set 100 is
standard)
Dim X As Integer, Y As
Integer, r As Integer 'X
and Y Coordinates of the Arc
Dim ArcStart As Single, ArcEnd As Single
'The beginning position of the Arc (in degrees)
Dim nCount As Integer 'Main
loop variable (used to move the arc)
'Make sure that the forecolor is vbRed and the backcolor is vbBlack ! I tried
using a different color combination and it didn't display anything !!!
RadarBox.FillColor = vbRed
RadarBox.BackColor = vbBlack
'The
next 3 lines make the arc fit into the PictureBox perfectly
X = RadarBox.ScaleWidth - 4
Y = RadarBox.ScaleHeight - 4
r = X / 2
'The next 4 lines set the drawmode stuff and
draw a circle (NOT AN ARC) for the arc to move in
RadarBox.DrawWidth = 1
RadarBox.DrawMode = vbCopyPen
RadarBox.FillStyle = vbFSTransparent
RadarBox.Circle (X / 2 + 2, Y / 2 + 2), r
'These next 2 lines also do some drawmode
stuff
RadarBox.DrawMode = vbXorPen
RadarBox.FillStyle = vbSolid
'Now... the big one ! This rotates and draws the arc 1
full rotation.
For nCount = 0 To 360
ArcStart = nCount
ArcEnd = nCount + ARCSIZE
If ArcEnd > 360
Then ArcEnd = ArcEnd - 360
RadarBox.Circle ((X / 2) + 2, (Y / 2) + 2), r, , -ArcStart * PI / 180, -ArcEnd * PI / 180
DoEvents
RadarBox.Circle ((X / 2) + 2, (Y / 2) + 2), r, , -ArcStart * PI / 180, -ArcEnd * PI / 180
Next nCount
End Sub
I really hope you liked this tutorial. If you did please vote for me.
Philip
 (3(3 Vote))